Davide Rossi – Alice Daniele (20XX)
Learning is a bit like a hat hook.
Say I’m wearing a knit hat–this one for example.
Further, say I’ve been trudging around in a snowstorm and it’s rather damp, so I peel it off and go to hang it up.
I can attempt to hang it on the wall all day but unless there’s a hat hook, all my efforts to hang it up are doomed to failure.
Learning is sort of like a hat hook. You can’t learn something until you have a place for what you learn to go–for lack of a better way of saying it: counter-intuitively, the learn something you have to already have some idea of what to do with what you are being taught.
I first encountered the notion of the Zone System in a cinematography workshop back in 2004. In hindsight the teacher was awful–he introducing it as a system of determining exposure codified by Ansel Adams and read this section from the Wikipedia article on the Zone System to us pretty much verbatim.
My response was well what the fuck does this have to do with fuck all else? (I lacked a hat hook (place) for my hat (what I was ‘taught’.)
Now that I do get the basic parameters of the Zone System, I have changed my tune a bit–it is EXTREMELY useful when producing a print or critiquing/responding to monochromatic work to employ the Zone System as a framework for analysis.
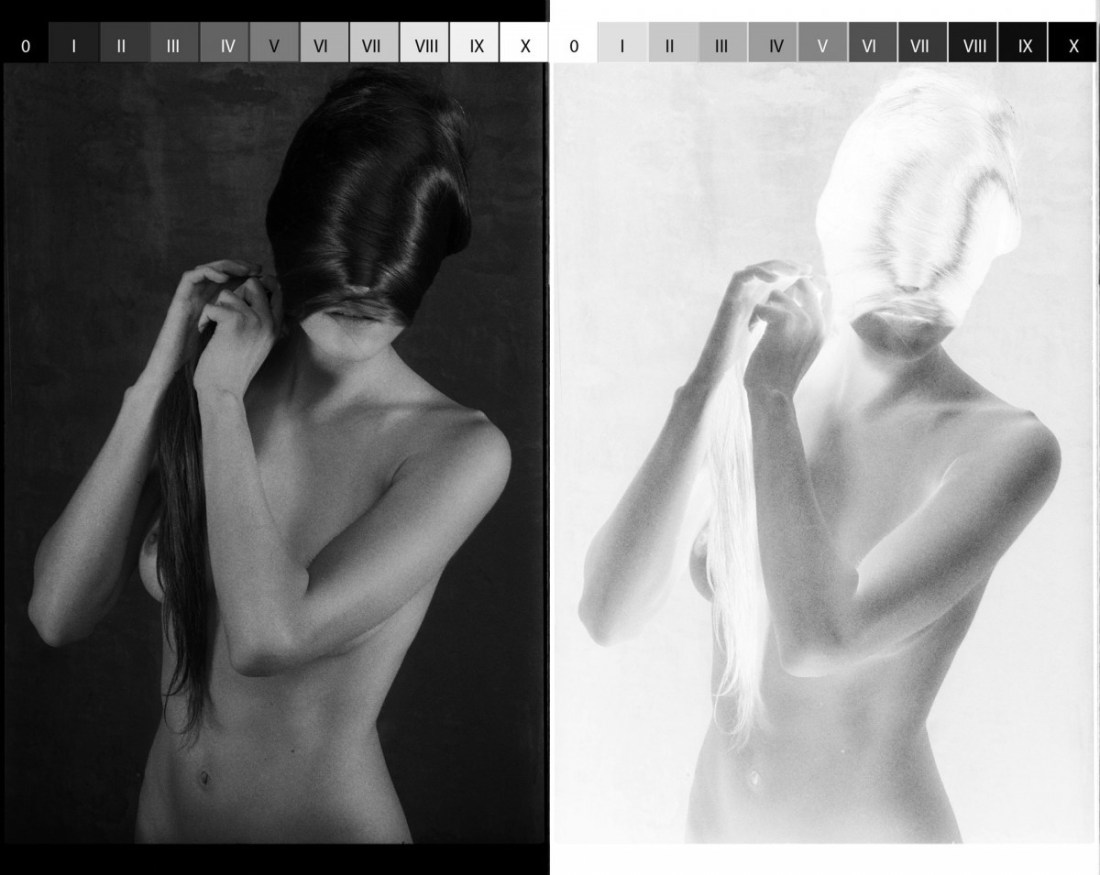
The image above is actually the first time it’s clicked in my head that the Zone System has application to not only printing and analysis/criticism, it has applications to the creation of the image itself, too.
Let’s back up a wee bit to get a nice running start. If you’ve ever taken a picture with any sort of attention, you’ll know that while modern cameras can do a reasonably good job left to their own devices. BUT! Should you want something a little more polished, you have to provide the camera some information. You can roughly encapsulate such information by suggesting the camera needs to know what’s white and how much light from the scene it should capture.
Modern cameras are super super smart about identifying what’s white–auto white balance is damn remarkable. The reason that we have manual white balancing functions is because you can creatively fuck with color by say holding a green sheet up paper in front of a sensor and telling the camera to recognize green as white. (As an example, the ubiquitous cinematography trend in the late 90s and early 00s, was to call pure white, white and then shoot under fluorescent lighting–which gives everything this nauseated green cast; think: Fight Club and to a lesser degree The Matrix.)
With B&W analog–everything is based off the notion of middle grey. (Zone V in both of the above images.)
In analog photography, you aren’t able to pre-visualize or relay on a histogram to determine optimum exposure (although if you’ve got megabucks like Daddy Warbucks, you can do Polaroid test shots… sigh, if only…).
In order to judge exposure analog photographers use a light meter. That light meter can be built in to the camera itself or be an independent handheld device–either way, it conveys what the optimum setting is to render an 18% middle grey value depending upon where you are taking the reading.
That last part is important. Like White Balance, you can selectively manipulate your image depending upon what you decide the camera should treat as middle grey.
I actually took the above image and chromakeyed out the tonality of all of the zones, individually. It looks like this:


Note: the fact that Zones VI-X are not represented within this image. (This would indicate that at the time the photo was made, an 18% grey value was attributed to a tone a good bit darker than actual middle grey.)
And while this is super useful in explaining the relationship between the negative (in this case Kodak’s Tri-X rated at 320iso) and ostensibly a print, to be ideally illustrative you’d want the image on the left above to appear all the way to right and to add a photo exposed to provide maximum dynamic range. Although that might end up detracting from the point since a pristine exposure will absolutely allow a talented print maker to replicate this effect in a print; however, a less than pristinely exposed image loses some of that latitude. (It’s hard to tell because I’m looking at a scan of a negative and not an actual negative and the relationship between the value of middle grey in digital vs what the human eye interprets is fundamentally different, still, it appears that this photo was underexpose by several stops from square one.)
